Showing posts with label project. Show all posts

Thursday, August 26, 2010

Collar for my Doggie

Oh hey.  Remember me?  Good. 

I've made a couple things recently and I've gotta share.  Today I'm sharing the dog collar I made.  Our Border Collie, Mattie(pictured here with a very handsome cowboy I just happen to know ;)),


is such a sweetie.  She's a working dog, so she helps out when we're moving cattle.  She keeps an eye on the kids when they're in the yard and "protects" them from anything: the horses across the fence, the cat, and especially anyone who pulls in the drive.  And when they get too rowdy for her she trots off and does a little gopher chasing, her favorite hobby.

We've had Mattie since the year we got married, so she's seen a lot of changes in the last few years.  And, she's had a lot less pampering.  Which is fine by her, she's just not that kind of dog.  I was brushing her about a month ago and took off her collar.  She has such long hair I usually don't see it at all, so I was surprised that it looked like this:


It used to be red.  And not quite so dirty.  Yuck, poor little doggie.  So, I made her this:

 
I used the clasps, slider thingy, and d-ring from the old collar.  The old collar was 3/4" wide, so I cut a piece of fabric 3"X22", pressed it in half width-wise, and folded the long edges into the center crease and pressed again.  Then I edge-stitched with some contrasting thread, placed the hardware, and stitched across the width to secure it in the same manner as the original.  Cute, huh?  Much better than the old version.  The next time I do it I'll add some decor-weight fusible interfacing because I noticed it's a little floppy after a couple weeks' wear.

Monday, May 3, 2010

Motivation Monday

This weekend, I worked on cleaning out my craft room so I could actually, well, craft in it a little.  It seems that we've been so busy lately.  It's calving season, the kids have all been sick a few times, especially Baby T, who's getting over a sinus infection.  Our town's Youth Center just had a big fundraiser to benefit the community swimming pool and I was on one of the planning committees.  My mother-in-law has been out of town, meaning that all trips out of the house are with 3 little ones in tow.  Oh boy, am I missing her!  It is such a luxury to have her nearby to watch a child or two when I need to run errands or just get some things done. 

Anyway, we've been so busy that I've gotten into a bit of a rut.  I talked to all of my sisters this weekend and I think I used the word "weary" to describe myself, oh, about 8 times.  Yikes.  It's time for an action plan!  Remember, I'm a list lover, so I'm going to make myself a few lists and check back in every Monday to update you all on the progress.


This is my fabric stash at this moment.  I finally pressed and folded some fabrics that I had bought and washed a at least a month ago.  Relief!  Now, I need to turn these beautiful, tidy little rectangles into things that make me happy.


I also cut out the ivory squares yesterday to use with the floral charm pack in my very first quilt.  I'm excited for this one.


In my never ending attempt to improve my photo skills I drug out our much beleaguered tripod.  Someone (me) let one or more of our children play with it at one(some) point(s) and now it needs a little tlc, or at least a couple screws.


Unassuming pieces of red and black fabric awaiting their transformation into a cape for a dashing little superhero. 


A whole pile of burp rags just begging for a little top-stitching.


And, a pile of knee socks needs to turn into a pile of legwarmers for my wearer of the dresses.

So, now you at least have an idea of the sewing projects.  I'll share more details as I complete them.  Here are the lists.  I have so many more project lists floating around more in my head, but they haven't solidified into anything I'm capable of typing out yet, so I'll share them as they evolve.

Works In Progress(WIP) in random order
birthday gift for my baby sister
leg warmers
superhero cape
quilt
checkbook covers and pouches
mending pile
drawstring bags for helmets

Home Decor
do something about the soffit over the kitchen sink
paint the living room trim
paint the porch/laundry room
paint the upstairs hallway
finish the photo collage frames and hang
paint the dresser in the living room
refinish our bedside tables
hang up the headboard

Things I Need to do to Make Life Easier (not a very short and catchy title, but at least it's vague;))
work with Baby T for an earlier bedtime
wake up before the rest of the family
eat healthy, regular meals
exercise
meal plan

Ok, so I'm off to work on these things.  I'll check back in and re-visit the lists on Mondays.  And probably add to them.  But, I'll also check things off, and that's what this is all about.


Monday, March 29, 2010

Blown Eggs - the EASY way!

Blowing eggs the traditional way can be a chore.  You have to mouth an egg and end up with two holes in the shell.  This way is much easier and your shell will have only one hole.  And, you won't get light headed unless you hyperventilate from sheer excitement.  In which case, you need to get out more. :)

Supplies:

*  eggs, can be dyed, but must be uncooked
* syringe with large gauge needle or sewing pin/needle and bulb syringe(also known as a booger bulb in our house)
*  some sort of receptacle to catch the egg innards
*  paper towels or old rag
*  mineral oil

Instructions:

1.  Decide which side of the egg you want to display.  On the opposite side, poke a small hole in the shell.  I used an 18 gauge needle and it went right in when I twisted it like a drill.  Then, I used the tip to break a tiny piece or two of shell outward.

2.  Wipe off the bits of shell using a paper towel or rag.  Try not to leave any loose pieces so you can use the eggs once they're out of the shell.
3.  Insert the needle and gently scramble the egg a bit in the shell.  You want to break the yolk up  a little.


4.  If using the syringe, pull the plunger back so it's full of air.  Insert the syringe or bulb syringe and gently blow air into the egg.  As air goes in, egg will come out.  Repeat as needed until the shell is as empty as you can get it.


5.  You have a couple options to clean the remaining egg residue from the shell.  You can use your syringe to squirt water in and blow it out until it runs clear(ish).  Or, you can hold the shell under running water in your sink, then shake the water out.  Both work fine, I did a combo of both using the syringe first, then the sink as I was washing the outside of the shell.

6.  Allow to dry hole side down or bake in a 200 degree F oven for 15 minutes.

7.  Dye or decorate, if desired.  I left my eggs natural, I love the variety of colors my hens lay.

8.  Coat lightly with mineral oil for a light sheen.  Pour a dime size amount on a paper towel, then rub the eggs well.  Allow to sit for a few minutes, then buff off the excess oil.  You could use a vegetable oil if you want, but the mineral oil will last longer.  This step is also optional.


Enjoy your beautiful eggs year after year.  Or until your kids break them. :)


Hints:

*  If you're using eggs you've already decorated, practice on one you don't love to make sure you've got the hang of it.
*  If you dye afterward, the eggs will float, so you'll have to fill them with dye if you want them to sink.
*  I did my eggs in batches as I needed them over the weekend for cooking and baking.  It only added about 5 minutes to each thing I was making and then the eggs didn't go to waste.


Friday, March 26, 2010

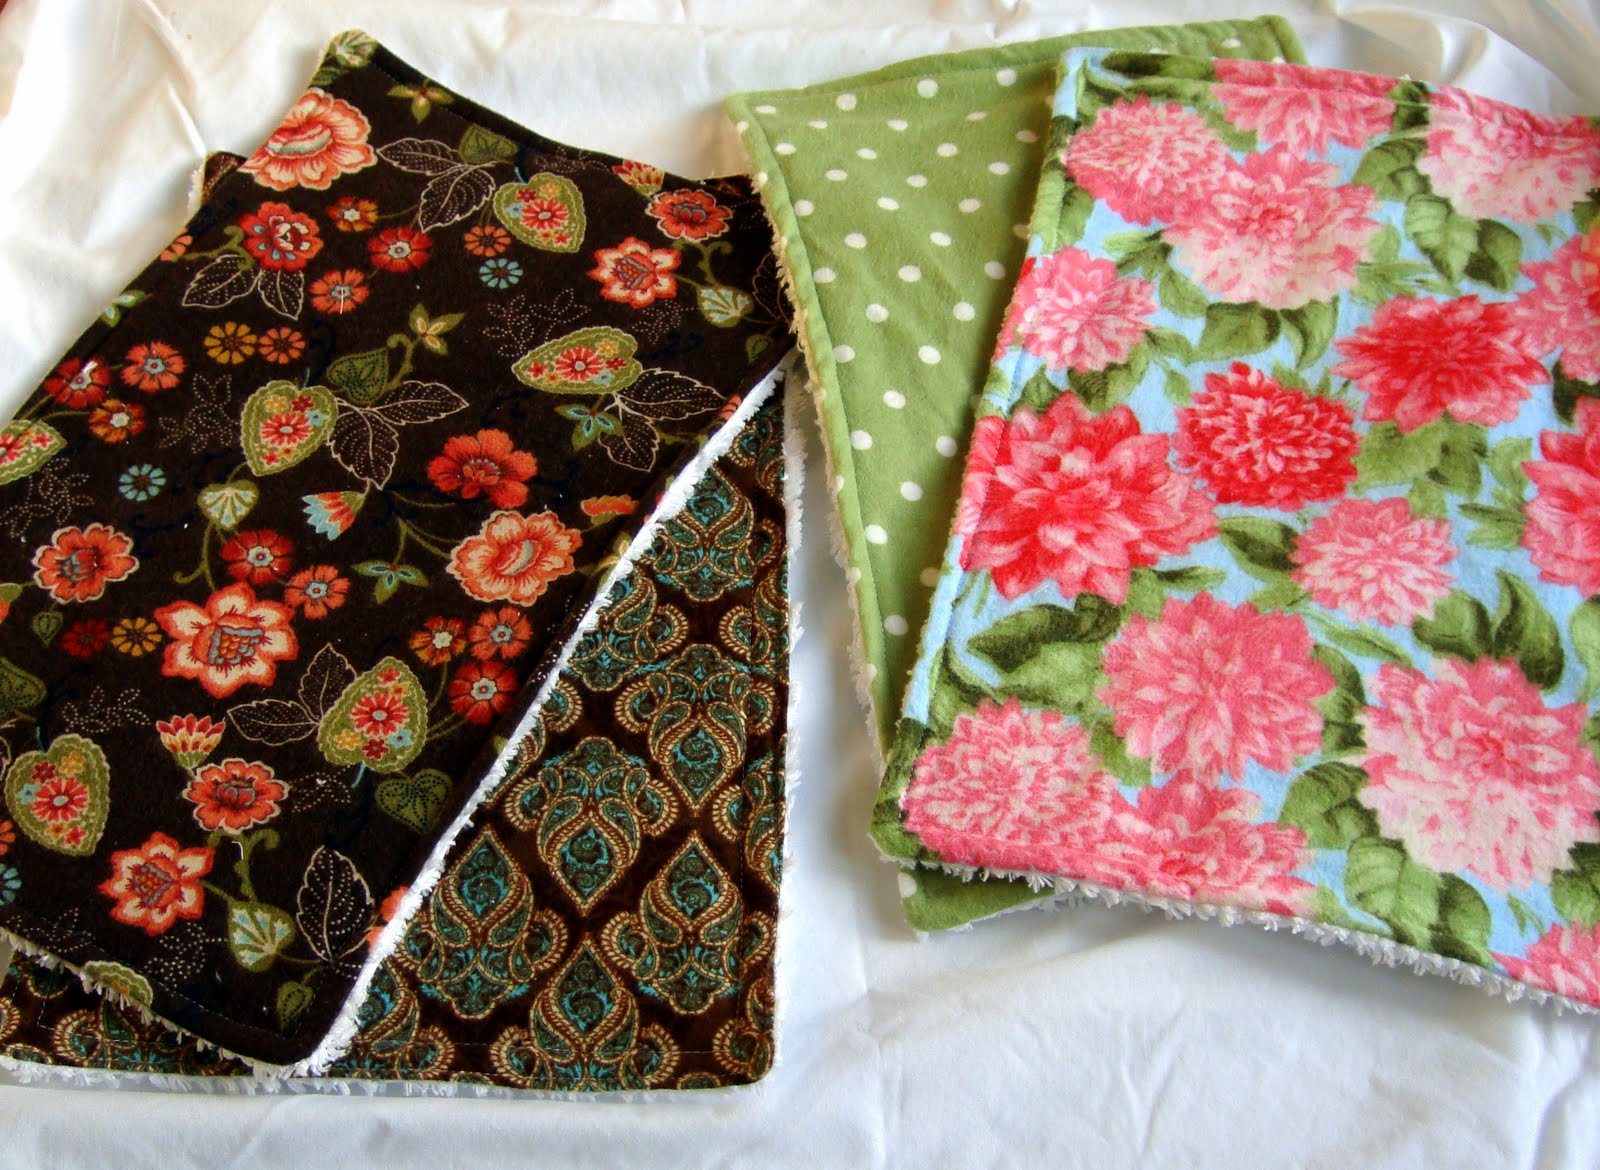
The Quest for a Pretty Burp Rag

My first baby didn't really spit up.  Baby number two spit up for a very short amount of time, until we figured out his dairy sensitivity.  Three, as we affectionately referred to him in utero, spits up a LOT.  After a couple of months of wearing soft, practical, and super absorbent cotton prefold diapers on my shoulder all day enough was enough.  I mean, I was using those things out in public, everywhere.  Not so pretty.  I had a few of those thin baby terry burp cloths, but, really?  Useless.

So, one day I bought some cotton chenille and flannel and these were the result.


They were a big step up.  Soft and absorbent and not diapers.  However, maybe I'm weird, but I am just so tired of pastels and baby prints.  They're cute on babies, but I'm not a baby and I'm the one wearing the darn thing 24/7, right?

So, back I go and this time I picked up some fresh white chenille and some pretty quilter flannel.  The quilter flannel is very soft and smooth and came in prints that appealed to me much more.


Now I'm happy.  These are functional and pretty.  And I need all the pretty I can get in this nose- and bottom-wiping, sleep-lacking, crazy wonderful season of life.

Thursday, March 18, 2010

More Baby Shoes

I made a couple more pairs of baby shoes this week.  The first pair is for Baby T. 

I'm not really crazy about them.  The fabrics "go" together nicely, but I wish I'd put the contrasting fabric on the soles, instead of the heels.  I fully lined these with white minkee, so they are nice and soft.  And, the toe and sole fabric is a super cute Buffalo Bill word print that is just right for my little cowboy.  Oh well, they'll keep his feet warm for the next few chilly months, anyway.  Oh, and you see how there's just one in the picture?  Wonder where his mate is?  Me, too.  I. don't. know.  He'll turn up, eventually... 

This next pair is for some friends who recently had a baby.  They are a 6-9ish month size and should fit the baby in the summer months, so I used a cute little crab print.  On these ones I lined the soles with minkee and used the contrasting fabric on the outer soles and inner lining.  Much better!  I'm wishing I'd stuffed the shoes with tissue or chunky baby feet for the pics now, but you get the idea.


I've also been tweaking the pattern and I'm starting to be happy with it. It needs a bit more, but I'm definitely getting close.  The first pair of shoes I made were fine, but I've been enjoying the creative process of making the pattern mine.  Not to mention adding to Baby's shoe wardrobe. 

I'm making a couple of burp rags to go along with the shoe gift, I'll share those next.

Friday, March 5, 2010

I Dream of Spring

Oh boy, do I ever have spring fever!  The weather has been lovely, highs in the 50s, and it's starting to smell good outside. 

We went skiing again on Wednesday and my project for the car trip this time was sorting through the seeds I have left over and going through the seed catalog and picking out what I want for this year.  And what I want for this year turns out to be a bit ambitious.  Oh, the plans I have!  I want to plant some fruit trees and bushes, expand my garden, add several beds to my yard, and start some new containers.  I want to grow enough veggies to freeze and can a large amount for winter.  And, most of all, I want it to be pretty!


photos from This Old House
Aren't those twig trellises cool?  I saw them in TOH magazine a couple of years ago and I think about them whenever I think about gardening.  They're pretty and functional.

I can see a romantic cottage-y type of yard surrounding our old farm house.  You know, the kind with rose bushes and hollyhocks and cosmos.  All lush and pink.  Like this:

photo from Country Living

Unfortunately, we also have rattlesnakes living near our old farm house, so I need to keep the yard safe and free of snake hiding places for my munchkins.  That means no lush bushiness in my yard.  Somehow, I'm going to make it work, though.

The other thing I want this year is to try my hand at edible landscaping.  I want to incorporate as many food plants into my decorative around-the-house planting as possible.  I love the idea of flower pots and beds being beautiful and productive.  I'm thinking strawberry plants in window boxes would be lovely...now I just need to talk someone into making and installing window boxes...

And, my sister gave me this book for my birthday last year.  She knows me well!  I want to adapt a couple of the ideas and plant a wall of sunflowers around the kids' playhouse and have some scarlet runner beans climbing up the posts.  Wouldn't that be a magical play area?

Since bushes are off-limits in the yard, I have plans for a small orchard near my chicken coop.  I've planted the seed(get it? planted?! oh, I'm so clever, hee hee hee) with Hubby and I think he'll fence off an area for me so any horses or calves in the pasture won't chew on the bushes.  I want to start off with some raspberries and gooseberries, maybe some pie cherry bushes, and whatever else I can get away with in this climate.

So, you can see that this all is not going to happen for me this year.  Not with my three little helpers to care for.  But, it is something for me to work toward.  And dream about.  Because it's March, and the weather's nice, and I can pretend that spring is almost here.


Linked to The Inspired Room

Sunday, February 28, 2010

Crochet for my baby

I made this in the car.  The hat, not the baby, silly.  This is the fourth hat I've crocheted.  The other three I made last summer to keep myself busy during bedrest. 

The one I had made for baby T earlier was from a baby yarn, and I wanted him to have one that matched his siblings' hats.

I think he likes it.  Doesn't it match his eyes well?
I was sorting through my yarn recently and realized that I have about 10 shades of blue yarn.  And that's all, no other colors.  Crazy, huh? 
I like blue. Blue is my signature color.
I've seen Steel Magnolias a couple of times...

Tuesday, February 23, 2010

Pretty Heating Pads


(old person voice) "I have an achin' in my bones!"

It's true.  My husband likes to joke about his "arthritic wife", and I don't mind at all because it makes light of a situation that could easily become depressing.  I developed arthritis about 6 weeks after the birth of my last baby, and am still waiting for a diagnosis.  In the mean time, though, I started making these rice bags to help the discomfort.  

I made my first one for my sweet girl, who had a tummy ache one night.  She slept so well after I gave her one of our old ones that I knew I was on to something.  But, she complained about the smell, so I made her a new one and scented the rice with essential oil to disguise the hot rice smell.  Now I use these little babies whenever my kids are having a hard time falling asleep and they work like magic.

First, if you want your bag to be scented, dump the rice into a bowl and sprinkle with a few drops of essential oil and stir.  I used lavender and a 2 pound bag of rice for each bag.  You want to make sure that the bowl and utensils you use won't absorb the oil or are ones you don't plan to cook with.  Let sit.

Next, cut the material you plan to use for the bag into the basic shape of bag you want.  The possibilities are endless.  I like to use old cotton clothing like t-shirts, jeans, or socks. 

These are about 10 inches by 10 inches.  I sewed the edges closed, leaving a 3 inch gap for inserting the canning funnel I used for adding the rice.  Then, I sewed them closed.
This is one from an old tube sock.  I added a few stitches to the center of it before filling to keep the rice evenly distributed.  Then I just sewed the top closed after filling.


Finally, I made very simple pillow cases that overlapped by a few inches in the back.  I wanted to be able to remove the bag and wash the case or to be able to replace the bag at some point.  Can you tell the boys' room has a western theme?

This one is for me.  Again, I just sewed a case a few inches taller and wider than the sock with some fabrics that made me happy.

In my microwave, the 2 pound bags take about 1 minute 15 second to be the right temperature for the kids and about 1 minute 30 seconds for me.  I mix the bag around to make sure that all the hot spots get distributed.  Of course, use common sense and start out with no more than a minute until you get a feel for your microwave.  And, for pete's sake, don't burn down your house or something.

Enjoy!


DIY Day @ ASPTL

Thursday, February 18, 2010

Craft-y Curtains

I love a good project. I have lists upon lists for my projects. Some are of projects I'm going to do, some are ideas for projects I might do. Some are lists of supplies that I need for projects. Can you tell I like lists? But that's a different story for a different day. The project I'm showing you today is my solution to one of the eyesores in our home.

The partition between our kitchen and dining areas has these cupboards and shelves on the dining side. I imagine that they were intended to store dishes, table linens, and other sensible, attractive items. Now they mostly house a huge amount of art and craft supplies. It's a great location for the craft stuff because we usually sit at the table to do crafts. And, with them right there, the kids can get the crayons and coloring books or playdough out by themselves while I'm cooking or cleaning in the kitchen. A few cookbooks have found their way in there as well.

This is very convenient, but not super aesthetically appealing. This little area can become shockingly messy in a very short amount of time. So, I bought a little curtain rod. A long time ago. Maybe a year? I don't know how long ago, really, but it was long enough that my kids found it and played with it. By "played" I mean whacked each other with it and eventually bent it. No worries though, I just bent it back into a semi-straight shape again. It's one of those tension rods that works just like a shower curtain rod and it was really cheap.

Last month I was in JoAnn's and I found this fabric on sale for $3 per yard. Nice and cheap and it matched my dining room and kitchen mistreatments. I learned the idea of mistreating from Nester, and she has saved us big bucks on window treatments. So I bought a couple yards.
Dining room windows 


Coordinating(and cheap!) fabric


Finally, I sewed a couple of very simple curtains. I measured the opening and made two panels a couple inches taller and about the same width. I finished the hems. Then I sewed a small pocket along the tops, inserted the rod, and now have a much more serene dining room. And my sweeties can still easily access their art and craft supplies. A definite win-win!
Before

After

My sweet boy demonstrating the ease with which he can access the shelves. He's very helpful. 


Much better, no?


Linked to Transformation Thursday at:

The Shabby Chic Cottage

LinkWithin

Related Posts with Thumbnails